

SKU Locations
This article is for SKU locations. For warehouse locations, see Warehouse Setup
When you import stock into a warehouse, SKUs can have a location. This is divided into Zone, Aisle, Bay, Shelf and Bin. Zones can also be used when applying allocation rules.
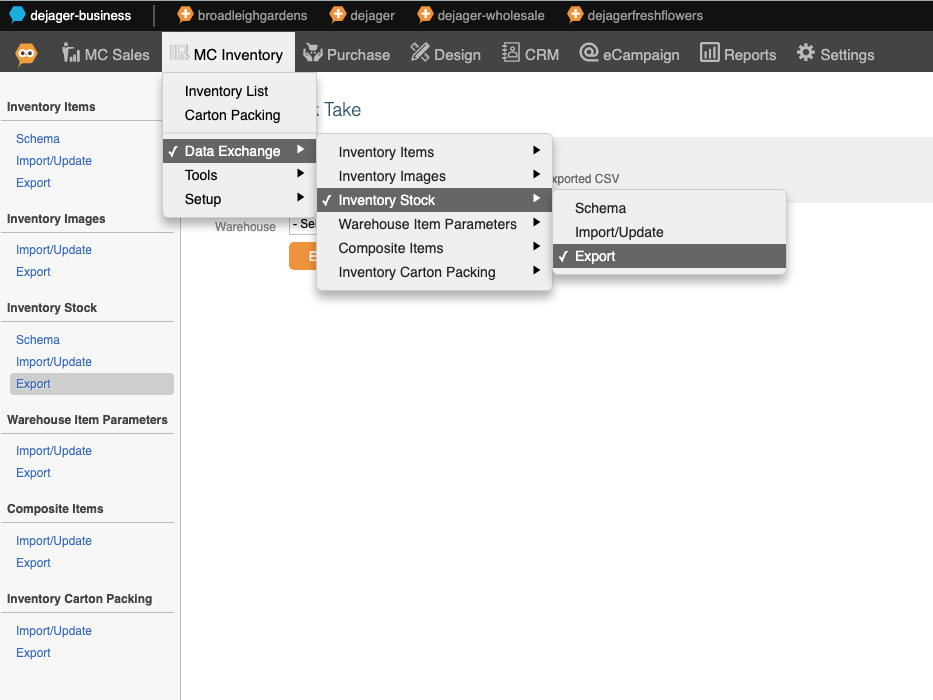
1) To do a stock take, go to MC Inventory - Data Exchange - Inventory Stock - Export
Choose a warehouse and click "export"
Here you will get a file that looks like this:

| warehouse_title | warehouse_zone_title | location_aisle | location_bay | location_shelf | location_bin | qty | batch_reference | date_expiry | date_manufacture | inventory_guid | inventory_batch_item_guid | location_guid | warehouse_guid | warehouse_zone_guid |
| Warehouse name | Zone name | Aisle | Bay | Shelf | Bin | quantity | Batch number | Expiry | Manufacture Date | Key field for master inventory item | Key field for master batch item | Key field for master location | Key field for master warehouse location | Key field for master warehouse zone. |
2) Update the rows as required.
If you want to change the quantity for an existing item, change the qty in the column for that SKU.
If you want to Move stock of an SKU to a new location, add or change the location_bin or other 'location' fields to the row.
If you want to Zero stock for an SKU set the qty column to Zero.
If you don't want to edit an SKU either leave it alone or delete the entire row. (Don't leave the SKU but with blank data. Just delete the entire row).
If you want to add stock to several locations, add a new row for the new locations with the same SKU, but with blank GUIDs for the new rows:

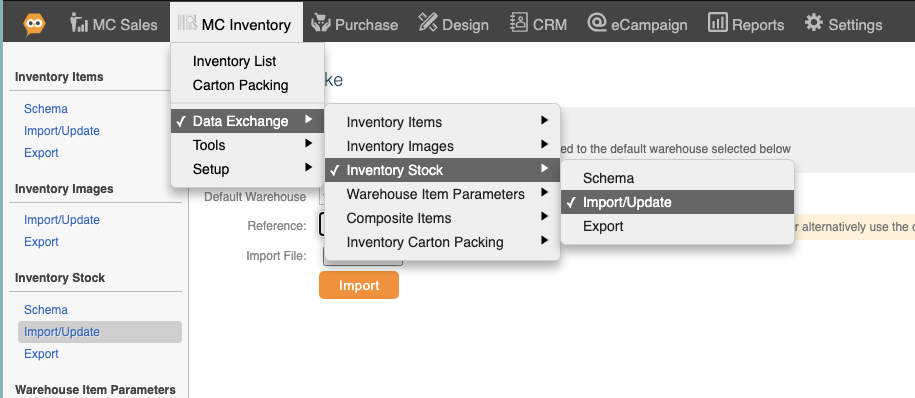
3) Save the file as a CSV file and reimport to the Import section:
4. See also: allocation rules with multiple locations. These determine how stock is prioritised when picking.
SKU Locations
This article is for SKU locations. For warehouse locations, see Warehouse Setup
When you import stock into a warehouse, SKUs can have a location. This is divided into Zone, Aisle, Bay, Shelf and Bin. Zones can also be used when applying allocation rules.
1) To do a stock take, go to MC Inventory - Data Exchange - Inventory Stock - Export
Choose a warehouse and click "export"
Here you will get a file that looks like this:
| warehouse_title | warehouse_zone_title | location_aisle | location_bay | location_shelf | location_bin | qty | batch_reference | date_expiry | date_manufacture | inventory_guid | inventory_batch_item_guid | location_guid | warehouse_guid | warehouse_zone_guid |
| Warehouse name | Zone name | Aisle | Bay | Shelf | Bin | quantity | Batch number | Expiry | Manufacture Date | Key field for master inventory item | Key field for master batch item | Key field for master location | Key field for master warehouse location | Key field for master warehouse zone. |
2) Update the rows as required.
If you want to change the quantity for an existing item, change the qty in the column for that SKU.
If you want to Move stock of an SKU to a new location, add or change the location_bin or other 'location' fields to the row.
If you want to Zero stock for an SKU set the qty column to Zero.
If you don't want to edit an SKU either leave it alone or delete the entire row. (Don't leave the SKU but with blank data. Just delete the entire row).
If you want to add stock to several locations, add a new row for the new locations with the same SKU, but with blank GUIDs for the new rows:
3) Save the file as a CSV file and reimport to the Import section: